7 Critical Steps on How to Clean Stitches Pus Safely and Effectively
When you’re recovering from a surgery or injury, the last thing you want to see is pus coming out of your stitches. It can feel scary, uncomfortable, and even a little overwhelming. But here’s the good news — learning how to clean stitches pus safely and effectively can make a huge difference in preventing infection and speeding up your healing process.
This guide will walk you through seven clear, practical steps so you can take care of your wound with confidence. We’ll also talk about when it’s okay to handle things at home and when it’s time to seek medical help.
Why You Need to Take Stitches Pus Seriously
A little redness or tenderness is normal around stitches, but pus is often a warning sign that your body is fighting bacteria. Ignoring it can lead to infections that spread deeper or take longer to heal.
That’s why understanding how to clean stitches pus properly is a skill worth having. It gives you peace of mind and helps your wound recover the way it’s supposed to.
Step 1: Wash Your Hands Thoroughly
Before you even think about touching your stitches, the first and most important step is hand hygiene.
- Use warm water and soap.
- Scrub for at least 20 seconds (sing the “Happy Birthday” song twice to keep time).
- Dry with a clean towel or paper towel.
This simple step prevents bacteria from your hands from getting into the wound. Think of it as setting the stage for safe cleaning.
Step 2: Gather the Right Supplies
Trying to clean pus without the proper tools can cause more harm than good. Prepare these items in advance:
- Sterile saline solution or mild antiseptic (like diluted Betadine).
- Cotton balls or sterile gauze pads.
- A clean pair of disposable gloves.
- Antibacterial ointment (if prescribed by your doctor).
- A small trash bag to discard used materials.
💡 Pro Tip: Keep a “wound care kit” in one place at home so you’re not scrambling for supplies when you need them.
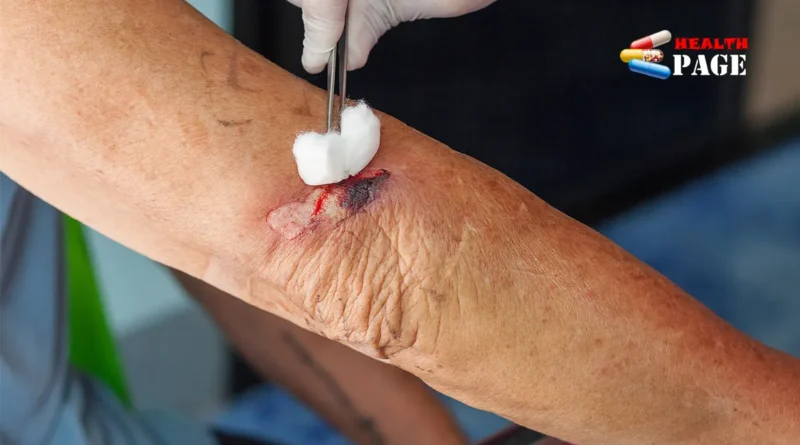
Step 3: Gently Clean Around the Stitches
Now it’s time for the actual cleaning.
- Put on disposable gloves.
- Soak a cotton ball or gauze pad in saline solution.
- Gently dab the area around the stitches — don’t scrub or press too hard.
- If there’s visible pus, wipe it away softly, moving outward from the stitches to avoid pushing bacteria inside.
The goal here is to reduce pus buildup without irritating the wound further.
Step 4: Apply Antiseptic Carefully
Once the area looks clean, it’s important to protect it from more bacteria.
- Use a small amount of antiseptic solution around (not inside) the stitches.
- If your doctor has prescribed an antibacterial ointment, apply a thin layer using a sterile cotton swab.
- Avoid using strong alcohol or hydrogen peroxide directly on stitches — these can slow healing and damage tissue.
This step adds a protective shield so the wound has a better chance to heal.

Step 5: Replace Dressings Regularly
Covering your stitches helps keep out dirt and bacteria. But leaving the same bandage on too long can trap moisture and pus.
- Always use sterile gauze or bandages.
- Change the dressing at least once or twice a day — or more often if it becomes wet or dirty.
- Secure the bandage without wrapping it too tightly (tight wraps can cut off circulation).
A clean, breathable dressing is like a safe blanket for your wound.
Step 6: Watch for Warning Signs
Even with the best cleaning routine, sometimes pus signals a deeper infection. Here’s what to look out for:
- Redness spreading beyond the stitches.
- Swelling or warmth around the area.
- Increased pain instead of gradual improvement.
- Fever, chills, or feeling unwell.
- A foul odor coming from the wound.
📊 Quick Reference Table: Signs of Normal Healing vs. Possible Infection
| Normal Healing Signs | Infection Warning Signs |
|---|---|
| Mild redness | Spreading redness |
| Slight tenderness | Increasing pain |
| Small clear discharge | Thick yellow/green pus |
| Gradual improvement | Fever, swelling, foul smell |
If you notice infection warning signs, it’s time to call your doctor right away.
Step 7: Know When to Seek Medical Help
Sometimes, pus around stitches is mild and manageable at home. But don’t hesitate to get professional help if:
- The pus keeps coming back even after cleaning.
- The wound looks like it’s opening up.
- You develop a fever or feel weak.
- The pain becomes severe and persistent.
Doctors may prescribe antibiotics or, in rare cases, reopen the wound to properly drain it. Seeking help early can save you from complications later.
Practical Tips to Make the Process Easier
- Stay consistent: Clean and check the stitches at the same time each day.
- Keep pets away: Pets are curious but can introduce germs.
- Stay hydrated and eat well: Good nutrition helps your body fight infection and heal faster.
- Follow doctor’s orders: If you were given specific cleaning instructions, stick to them.
Conclusion
Dealing with pus around stitches can feel worrying, but knowing how to clean stitches pus safely gives you control over your healing journey.
By following these 7 critical steps — washing your hands, gathering supplies, cleaning gently, applying antiseptic, replacing dressings, watching for warning signs, and knowing when to seek help — you’ll protect your wound and support your body’s natural recovery.
Remember, you don’t have to do this alone. If something feels off or you’re unsure, reach out to your healthcare provider. Healing is a team effort, and you deserve to recover safely and comfortably.
Pingback: Neurotic Diseases: 10 Shocking Truths You Must Know Today